Sunday, July 1, 2012

DIY Dry Erase Calendar

Hello everybody! I hope you are having a good weekend. I am just so thankful that this week is going to be a short one for me with the holiday! I was browsing around on Pinterest and found that dry erase markers work on regular old picture frames. I was thinking of all the neat things I could make and I heard a crash. My sad old dry erase calendar fell off the wall. This thing has been around for the last six years. The white is more yellow the plastic frame is all cracked and the part that was supposed to be holding it up just broke off. My husband works long strings of weird shifts so it is the only way I can keep track of where he is and when he will be home so I couldn't just trash it and wait until I went to town and got a new one. I then decided to head to my basement and see if I had any old frames lying around....

And this is what I ended up making!

Project Ingredients:
An old picture frame
CCR
A Child's Year Cartridge
Songbird Cartridge
Red, White, Blue, and Silver Cardstock

How I did it:
This was actually really easy to put together. I went into CCR and used the rectangle from CCR Basics. After some sizing around I had it fill the screen creating 7 days for four weeks....it wasn't until AFTER I cut that I remembered that there are more than 28 days in a month but hey calendars do that hash tag thing all the time (and I can fix it next month).  Took my 12x12 sheet with the squares cut out and adhere it to my red cardstock. I then cut out the little figures from A Child's Year and the month from Songbird. They are all essentially attached to one another so in August I can pull out my July and place in a new month with designs. I left the numbering to be done on the outside so I could reuse months every year if I didnt have time to make a new one. My goal is to work on the months way in advance but we all know how that goes. I will be sure to post August once I get it going!


Thanks for looking and happy crafting!

This project has been entered into some super fun challenges at Catch The Bug, Bitten by the Bug 2, and  My Sheri Crafts. Go join the fun!

Friday, June 22, 2012

O-H...I-O

I hope everyone had a fabulous week! I for one am ready for the weekend because my husband and I will be celebrating our third wedding anniversary! Technically it isn't until Wednesday but with work schedules not really allowing us time to even go out to dinner we are celebrating early this weekend. Since we are trying to stick to our monthly budget we challenged ourselves to stick to a budget of 10 dollars for a gift. In the words of Barney Stinson....CHALLENGE ACCEPTED!

My husband is a huge Ohio State fan and when I say huge I mean huge. It is to the point where we have a room dedicated to the Buckeyes in our house for all his memorabilia and Buckeye swag. One thing the room is missing is something to pretty it up a bit and this was where my lovely gift comes in.

Ta-Dah! Melty crayon art with a football twist!

Ingredients:
CCR and CCR Basics
A Child's Year
Old West
2 Red, White, Black, Gray Crayons
Hair Dryer
Red, Green, Brown, Tan, Silver Vinyl
Canvas Board


How I did it:

The first thing I did was take my crayons and remove their paper wrapping. I then broke them in half and placed them randomly around the top of the canvas. I used a little bit of painter's tape to secure them down and I was ready to go for the fun part! I took my hair dryer and put it on the highest setting and starting melting the crayons. I turned my board all over the place so it would run in lots of different directions. If an area was looking too much of one color I would pick up the melted crayon chunks and move them to other parts. I kept doing this until everything was melted down and there were no crayons left.


Then I opened up CCR and began creating a Block O. This took some time and lots of adjustments but with the rectangle from CCR Basics and patience I was able to get what I think is a pretty decent Block O. I am really thinking they should make a NCAA Cartridge....think of all the possibilities! Mascots, School Symbols, Helmets! It would be awesome! Back to the project though...I then used the holly leaves from A Child's Year and made a buckeye out of two circles. I cut all my images from vinyl using the tried and true kiss cut on my Cricut 3-3-3. 3 speed, 3 pressure, 3 blade depth. Works like a charm!


I transferred all the cuts onto the canvas to make the Buckeye Block O. The only problem was that the crayon part was bumpy and put lots of bumps in my vinyl. I was really bummed at first because I thought it wasn't going to work out, but after awhile I thought it didn't really look that bad!


Finally I used my Old West Cartridge and with the help of CCR cut out The Ohio State University. Yes...the THE is important to us Buckeyes. I placed in on the canvas and my project was complete!


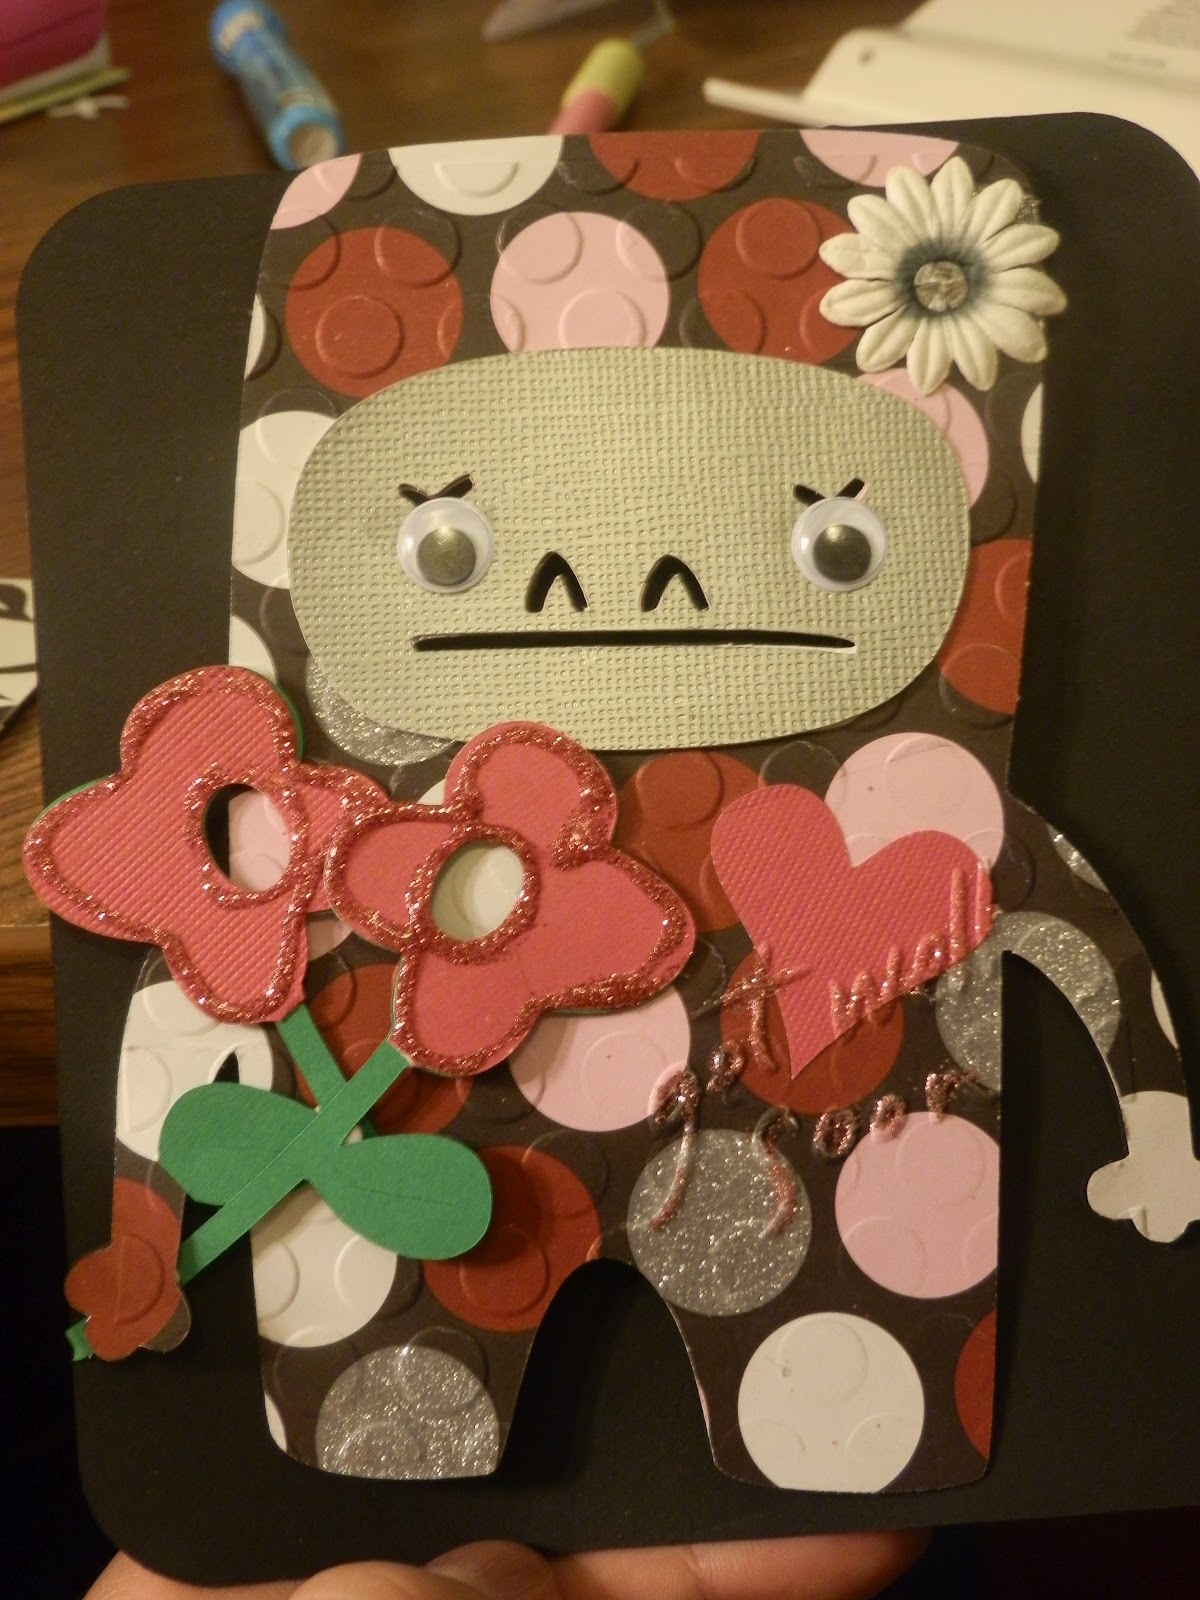
BUT no project is complete without a card right??? A few months ago I saw a card on the Cricut Message Boards that I thought was so cute! I cannot for the life of me find the post even though I swore I saved it in my favorites. I knew this card would be perfect for my hubby and thank you to whoever was the original creator!

 
How stinking cute is that?!?! 

Thanks for stopping by and happy crafting!


Thursday, June 21, 2012

Tasty Summer

I finally had some time to browse around some blogs and came across some fun challenges! One on the Cricut Circle Blog challenged us to use a sun and summer. The other challenge I found on My Craft Spot asking readers to use a sweet treat from summer. I decided to combine them together and came up with this!

All of my cuts came from the Simply Charmed Cartridge. I stamped the watermelon face using my Peachy Keen Stamps. This card was quick and simple to make. I plan on sending it to my sister so she can get some mail at her new house!

Thanks for looking and happy crafting!

Monday, June 18, 2012

Finally able to post some work!!

Alright my camera is good to go now and I am ready to share what I have been working on!

First is a couple of congratulatory cards for a coworker who got a promotion and a friend who just graduated!


This card I made using the "Card 2" feature on the French Manor cartridge. I then took the "Way 2 Go" from Tags Bags and More 2 and cut it on the inside. This card was for a guy so I thought I would man it up a bit by embossing the front.

This one I made using my Wild Card cartridge. I loved using this cart as it was completely effortless. I just followed the layers and I was done! Great for a last minute card!

I also spent some time making my sister and boyfriend their housewarming card. This is what I came up with.


I thought it would be fun to make doll versions of themselves and it finally gave me an excuse to use my Teen Scene Paper Doll cartridge.I made the house from the Wild Card Cart. I couldn't forget their cat Luna so I used meow to cut a chubby kitty. I just colored her spots on so it would look more like her. It was a real hit!


I also spent some time moving my craft room into our basement. There just isn't enough room in our office and I think my husband felt I was taking over. We now joke that I have been moved to the dungeon. It is still a work in progress but I have big plans for it once I get finished.

 I found an old DVD holder down there and have now converted it to my new cartridge holder! Time to get some more cartridges!!


I am also in the middle of a fun ABC book project. I made one for one of my kiddos on my list but forgot to take pictures. The foster parents loved it so much I am making on to put into our charity auction! I will definitely post it once it's finished.

Hopefully things will settle down here and I will be able to post more regularly.

Thanks for stopping by and happy crafting!


Saturday, June 16, 2012

Lots of Projects...No Pictures

Hi all. I know I haven't posted in awhile but I have been working hard. I turned my basement into my own crafting area and in the move I lost the cord for my camera. I have made it my mission to find it so I can show you all what I have been working on. Lots of cards and a new project on its way!

Friday, June 1, 2012

Kitchen Decor Part 2!

Today I had a really long day at work. Being a social worker can be rough and boy today really did put me through the ringer, so thankfully when I got home I not only had my Cricut Circle welcome kit waiting for me but the Love You A Latte cartridge I won on eBay. Talk about a pick me up! The Love You A Latte cartridge is perfect for the little project of decorating my kitchen so it couldn't have come at a better time. So let's take a look at what I created!
 
Project Ingredients:
8x8 Canvas
Love You A Latte Cartridge
Cuttlebug and Embossing Folder (I really need to figure out the folders that came with my package)
Baker's Twine Yellow and Pink
Brown/Tan/Checkered Pink & Yellow Cardstock
Mod Podge
My ATG Gun


I started this much like the one on my previous post by covering my canvas with card stock using Mod Podge. I wanted to try something different so I thought why not emboss it? Well the answer to that is because you cant fit more than 6 inch wide card stock through your Cuttlebug right? WRONG! So I decided that if I smashed all the paper in the folder it would all get embossed someway even if it isn't uniform  So I folded my paper to fit in the folder and ran it through hoping for the best. Hey you gotta try right? Well what came out wasn't bad....not bad at all. I smacked my newly embossed card stock onto my canvas and had my base!

I then hopped over to my Cricut and started cutting my layers. I skipped the base layer since my base was my card stock covered canvas. I cut everything on my Expression on size 7. I then, wanting to keep my theme of using baker's twine throughout my kitchen pieces, tied two little bows and stuck them down on the bottom for fun embellishment. I swear one day I will be able to tie a decent bow but until then these will have to do!


That's my short and sweet project for the night. I have a sink full of dishes calling my name and laundry that sure isnt going to wash itself!

Thanks for stopping by and happy crafting!

Thursday, May 31, 2012

Kitchen Decorating

Happy Thursday! Only one more day of work until the weekend! I am on call though so it really wont be too much of a vacation for me. I finally had some time to work in the craft room due to some rainy weather keeping me inside.

We have been in our house for almost a year now and have done a lot of improvements. Including painting our kitchen and stripping some awful wallpaper that came straight out of the 70's. We are talking all kinds of fruit bouncing around some brightly colored shapes! Now that we have painted our easement in our kitchen one color I was bummed that everything looked so plain. After browsing through my ever growing collection of cartridge I came upon the pie in Country Life....enter my brilliant idea to make some art with my Cricut!

Project Ingredients:
  • 8x8 Canvas
  • Mod Podge
  • Some really cute kitchen-y cardstock that I have no idea where I got (sorry)
  • Country Life Cricut Cartridge
  • Bakers Twine - Oatmeal
  • Zig 2-Way Glue
  • G Studio Gray Ink
  • G Studio Gold Ink

 I started off by covering my canvas with the cute kitchen cardstock with lots of sayings on it. I used Mod Podge too keep it stuck on the canvas. I then cut the Pie cut (the very last design) on the Cricut Country Life cartridge. I cut all the layers at 7. With a lot of trial and error I finally figured out where I wanted my pie placed on the canvas. I centered my Bakers Twine "X" right under my pie and criss crossed it around the canvas. As I was putting my pie layers all together I decided it needed to be dressed up a little.

I fan folded the pie pan to give it that crinkly look. I used my gray ink on the steam to make it appear more steam like. The rolling pin looked nothing like my rolling pin. I have an old one that has been in my family forever. Sure I have nice new ones but for some reason I just like to use my old one when making pie crust. It just rolls better! So I decided the pin needed to look a little worn with love. I took my Zig 2-Way glue and ran it all over the middle of the rolling pin. I rubbed it in with my fingers creating a streaky wood grain look. I then took my gold ink and lightly brushed ink in spots all over it with a fine paint brush. Viola wood look! May not be as good as some of the distress stuff but hey it works for me!


I have 3 more of these canvas and I plan to make some similar stuff with those. I hope to have a nice kitchen collection by the time I am done!


Thanks for stopping by and happy crafting!

Monday, May 28, 2012

Happy Memorial Day!

I hope everyone had a great holiday weekend! I didn't have a chance to get much done this week due to the holiday and having a house full of friends and family. I have a few projects in progress that once they are finished up I will be posting. I am hoping to get some stuff done this week but for now it is time for a nap!

Happy crafting!

Tuesday, May 22, 2012

Floating Frame

I havent had a chance to do much crafting as i have been crafting on my yard on the weekends. During the week I have had to work late and being on call I never know when I have to run out and I hate starting a project and having to stop in the middle of it.

So, I thought I would post an entry about something I made a few weeks ago. I posted it on the Cricut message board and had a lot people message me for the details so here we go!

I found this quote on Pinterest a while ago and it had been sitting on my "Crafty Things" board just looking at me asking me to make something of it. It really is inspiring and I feel has some pretty important message to it.

What I Used:
11x14 Floating Frame purchased at Joann Fabrics
Black Vinyl
Red Vinyl
A Child's Year Cartridge
CCR Basics
Songbird Cartridge
Pooh Font Cartridge

Batman Cartridge
Kate's ABC's Cartridge
CCR

I planned out all of this on CCR. Ever since I figured out to use it correctly I cannot get enough of it! I lined up everything on my virtual mat until I had it placed just how I liked it and then used the kiss cut of 3, 3, 3. 3 speed, 3 pressure, and 3 blade depth. Worked liked a charm. I then cut the scalloped heart from CCR Basics in red vinyl the same size as the font on that line. I used contact paper to transfer the vinyl cut out onto the glass in the frame. It came out better than I had anticipated!

I'll close with some pictures of my pretty flowers. Outside art :)


Saturday, May 19, 2012

Get Well Soon!

My niece is going to be having surgery so I thought that I would make her a card to cheer her up. She is at the age where she is too grown up for cutesy cuts but way to young for a simple adult card. This is what I ended  coming up with!
Stuff I Used:
Wild Card Cricut Cartridge
Googly Eyes
Flower
Rhinestone
Cuttlebug Embossing Folders (I have no idea what they are called, I really need to get on that!)
Stickles
Get Well Sentiment Stamp

I used the monster cut from the Wild Card Cricut Cartridge. I cut the envelope first at fit to page which ended up being 5" and I cut all the other layers accordingly. I embossed my liner for the inside of my envelope with the folder that came with my Cuttlebug.

I embossed my little monster with my Cuttlebug to give her a little pop. I also embossed the sentiment get well soon near her heart and brushed it with glitter. I didn't really like the X's for eyes so I glued on some googly ones instead. No girl can go without some sparkle so I added a flower to her hair? Well she's a monster so I guess fur with a tiny bit of bling in the center! I cut an extra flower because I thought she looked a little sad with only one. The way she looks in the picture though she still looks sad with her eyes! I swear if I wiggle them she doesn't look so depressed.

 Inside I stamped "Get Well" and will put a little message.

I am hoping this card will lift her spirits. She is a tween with an attitude so I think it might be right up her alley. This isn't her first time having to get surgery but hopefully it will her last! Thanks for looking!


Thursday, May 17, 2012

Mother's Day Project


I wanted to make something special for my mother in law this year. I thought a mini album was the way to go! This was my first attempt at using chipboard in my Cricut. It was a quite an experience but once I figured out multi-cut and my deep cut housing settings I was good to go!

What I Used:
Cricut Craft Room (without it this whole project would not have worked at all!)
CCR Basics
A Child's Year
Nate's ABC's
Sophie
Lot's of flowers
Ribbon
Buttons
Twine
Cricut Markers

 I welded the scalloped square with the letters in CCR. I put a tiny little circle in the upper left handed corner that I used to tie everything together with ribbon.


I used Nate's ABC's and A Child's Year silhouettes for embellishment with a pop of color from the flowers


I used buttons and twine for the centers of my followers on all the pages.


I used Sophie and my Cricut markers for the front. I found the quote on Google! I placed pictures of my husband and his mom on the first few pages. At the end I put a picture of all of us at our wedding. She really did enjoy it!

Wednesday, May 16, 2012

Getting warmed up!

Here's a little card I put together tonight instead of doing some much needed laundry. I recently purchased a Cuttlebug through the HSN deal and finally got to play with it tonight.


Supplies:
Simply Charmed Cartridge
Paper Lace Cuttlebug Folder
2 White Buttons
Light Blue Bakers Twine
Red Chalk Ink
2 Rhinestones

The Specifics:
The card is a standard A2 card. I embossed the front half of the card with the paper lace folder with my Cuttlebug. Both penguins were cut at 3 inches. The dotted border is one inch wide that I "cut free hand (hence the crooked tilt). "Chill Out" is cut at one inch for both layers. I added the buttons with the bakers twine tied through it for a little embellishment. I have a thing for bling so the bows for both penguins got a little sparkle. I will probably send it to my sister with a care package for finals week! Thanks for looking!

Ready to get back at it!

I know it has been a long time since I posted on here. Life has been really hectic and my crafting had to take a back seat for awhile. I am ready to get back to crafting and using it to destress! I will post some of the things I worked on during my hiatus and I plan on really keeping this up from now on. I promise!

Sunday, March 11, 2012

Saint Patrick's Day and Easter

Happy Saturday all! I whipped together a few Saint Patrick's Day cards I wanted to send out and started on an Easter one so I will be able to do a few before it gets here. Sorry about the picture quality. My good camera's batteries are dead. Thanks for looking!

Hat is from Everyday Paper Doll  Dress Up. I added some flowers in the back for pop.
This one came out a lot better than the picture shows. I sponge painted the paper for a textured look.
I love how this came out! The birds and eggs are cut from the 3 Birds on Parade cartridge. I used Peachy Keen stamps for their faces. The basket is from Create a Critter and the grass and clouds from Everyday Paper Dolls.


Sunday, March 4, 2012

Taking it Easy!

Seems like everyone is coming down with something so I made this simple little get well soon card using the Paper Pups cartridge. I got the digital version back when cricut.com had a special on their digital cartridges. This little guy was pretty easy to create in the Cricut Craft Room. The font is from A Child's Year Cartridge. Enjoy!


Wednesday, February 29, 2012

A Simple Best Wishes Card

Our attorney at our office is leaving so my co-workers and I decided to throw a surprise party for her. I thought I would whip together a card for her wishing her the best of luck at her new job. I think it turned out quite nice. I used the best wishes from the 3 Birds on Parade cartridge and the card base I cut from the Sophie Cartridge I won on the Cricut Craft Room Challenge last month. I really LOVE this cartridge. I cannot thank the ladies over there enough for offering it as a prize :)

Now to the photos!!

The first time I made the "Best Wishes" part it was a little big so I used it to decorate the corners.

I left the inside black so everyone could sign and leave their own message. I sponge painted the front of the paper and where the cut outs were so when you opened it you would have tiny flowers. I embellished them with bling in the middle.

Up close photo :)
Thanks for looking and have a great Leap Day!

Monday, February 27, 2012

Long Time No Post...

So I have to admit. Life has been crazy and this whole blog thing got put on the back burner for awhile. My crafting has not stopped at all though so I will post some lovely things I have made since my last post :)

A just because card that I thought came out lovely.

A simple Happy Birthday card with a funky envelope to match :)

I just love this little monkey!

My first attempt at the Batman Cartridge. Seriously rough need to make these bad boys bigger next time!

I love the bat cut outs on the handle.

Nick's Valentine that I absolutely love. Made with the Sophie cartridge I won in the Cricut Craft Room Challenge. One of the best cards I have made.

My first attempt at some vinyl on canvas. I did some melty crayon art and came out with this lovely piece.

I promise to do better on updating. I am trying to get some of my St. Patty's Day and Easter cards going this month and cannot wait to share with you all :) Happy Crafting!